How to set up WhatsApp automation flows

A WhatsApp automation flow (called a step-by-step reply in the app) starts when someone messages you and follows the exact path you draw: ask, wait for the answer, branch, send a template, tag and hand over. You build it on the Flows & forms tab, test it, then switch it on.
There are three ways to answer without a person. The chatbot answers freely from what you told it. A step-by-step reply follows a fixed script, such as a menu or a booking path. A form in the chat collects details like a date or a budget. This article covers the last two.
Who can do this: WhatsApp and Automations need the Starter plan or above, and you need a connected WhatsApp number. Letting the Chip chatbot answer on its own needs Growth or above. Each run counts towards your monthly automation runs.
Steps
- Open Flows & forms
In Marketing › WhatsApp, open the Flows & forms tab. The "Three ways to answer" guide at the top shows what each option looks like to your customer, so you can pick the right one.
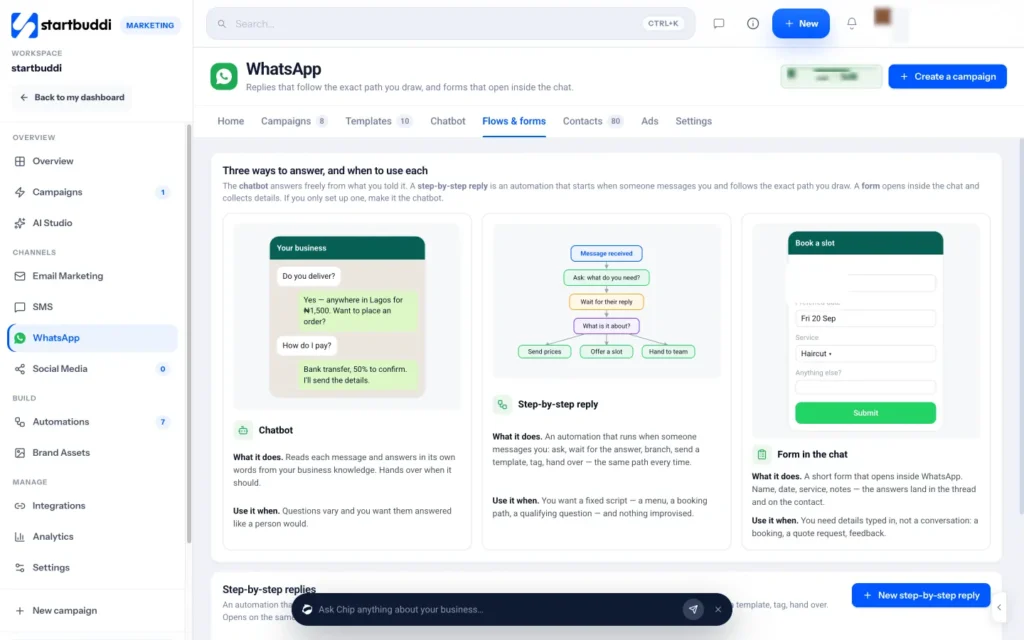
- Click New step-by-step reply
Click New step-by-step reply. The automation canvas opens with a starter script already in place: greet, wait for their reply, work out what it's about, and answer each path. You change the words and paths from here.
- Edit the steps on the canvas
Click a step to change its wording, or add new ones from the step library. Useful steps for WhatsApp include WhatsApp message (an approved template, free text or a form), Wait for their reply, Condition, Add tag, Create task and Assign to teammate. Free-text messages only reach people who wrote to you in the last 24 hours, so use a template for anything later.
- Add a form in the chat (optional)
Back on Flows & forms, click New form. Start from Book a slot, Get a quote or How did we do?, or build your own with short text, long text, email, date and choice questions. Publish it, then send it from a WhatsApp message step or from the inbox. Answers land in the chat thread and on the contact. Once published, a form can't be edited (Meta's rule), so use Take it off and make a new one if it needs changing.
- Validate and test the flow
Click Validate in the canvas toolbar and fix anything listed under errors. Then click Test and choose Test with a contact or Simulate an event to see how the flow behaves before real customers meet it.
- Switch it on
Click Activate. The Review before activating window checks consent and who can be reached; click Activate automation to confirm. The flow now shows as On in the Step-by-step replies list.
- Use WhatsApp in your other automations
Any automation can send WhatsApp too. In Automations, add a WhatsApp message step after a trigger such as New booking made or Form submitted. To start a flow only on certain words, use the WhatsApp message received trigger and fill in Only when they write (for example: price, menu).
Troubleshooting
The New step-by-step reply button is greyed out.
A flow needs a number to send from. Connect and register your WhatsApp number first, then come back to Flows & forms.
Validate warns about free-text WhatsApp messages.
Free-text WhatsApp only reaches people who messaged you in the last 24 hours. If a step might run later than that, pick an approved template instead so everyone receives it.
Should I use a flow or the chatbot?
Use the chatbot when questions vary and you want them answered like a person would. Use a step-by-step reply when you want the same fixed path every time, such as a menu or a qualifying question. If you only set up one, the app recommends the chatbot, which needs Growth or above to answer on its own.
Olabimpe Salami is the email and outreach specialist at startbuddi. Olabimpe writes about the messages that bring customers in and back: email, WhatsApp and SMS campaigns, follow-ups, and turning enquiries into paying clients.
Runs email and outreach at startbuddi