How to create a form in startbuddi


You can create a form in startbuddi in a few minutes: give it a name, click the questions you want onto the page, choose what happens after someone submits, then publish. Every answer is saved in Forms, and you can choose to add the person to your contacts at the same time.
Before you build a form
Anyone on your team with edit access to Forms can do this. The Free plan includes 1 form, Starter includes 20 and Growth and Scale have no limit. Submissions are not counted, so a busy form never stops taking answers. If you would rather start from a sentence, Chip can draft the fields for you, using Chip credits.
New to forms? Our short guide on what a form builder is covers the basics, and the Forms overview shows everything the module does.
Steps
- Start a new form
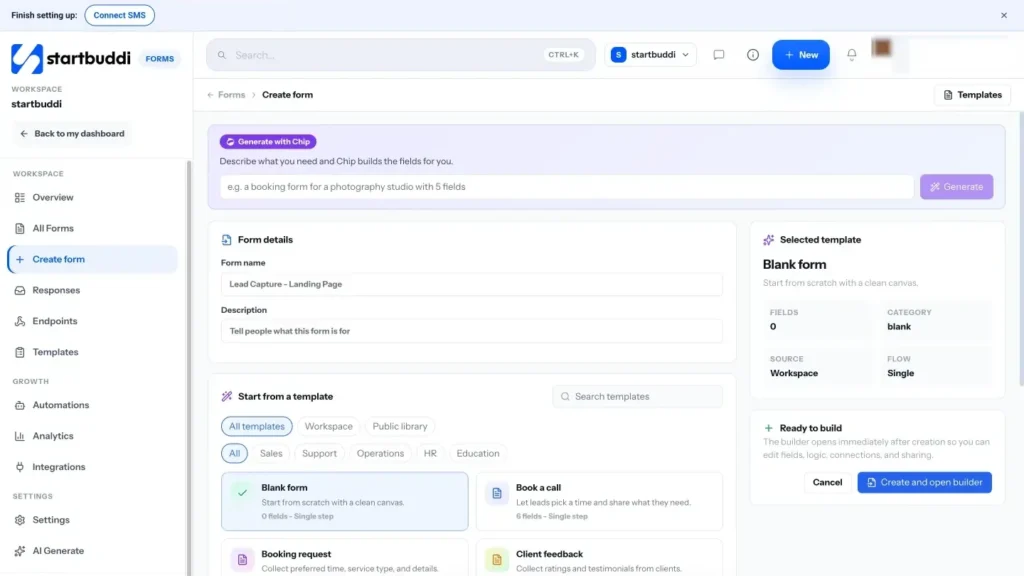
Open Forms from the sidebar and click Create form. Type a Form name and a short Description so people know what the form is for.
You can pick a starting point under Start from a template, or type what you need into Generate with Chip (for example, "a booking form for a photography studio") and click Generate. Then click Create and open builder.
- Add your questions
On the Build tab, click a field type on the left to add it to the form. The Basic group has Short text, Long text, Email, Phone number, Number, Dropdown, Multi-select, Radio buttons, Checkboxes, Date and time, File upload, Signature and Rating. Use Heading and Divider from the Layout group to break a long form into sections.
Drag a field by its handle to move it. Each field has Duplicate and Delete buttons for quick changes.
- Set up each field
Click a field to open its settings. Change the label, turn on Required for anything you must have, and add a Placeholder or Help text if people might get stuck. For choice fields, use Add option.
Two settings save you work later. Save answer to contact property copies the answer onto the person's contact record, and Counts as marketing consent marks a tick box as permission to send marketing.
- Add logic if you need it
Open the Logic tab to show, hide or skip questions based on earlier answers. Each rule reads When something is answered, Then show, hide, make required, jump to a question or page, or end the form.
You can also describe a rule in plain words, such as "if they choose Website design, ask for their URL", and Chip builds it for you.
- Choose the look and what happens after
On the Design tab, Theme sets the Accent colour, Appearance (light or dark), Form width, Background and Submit button text.
Under After submit, pick When someone submits: Show a message or Send them to a link. Write your Confirmation message and, if you like, turn on Email them a confirmation.
- Preview and publish
Your changes save as you go, and Save in the top bar saves straight away. Click Preview to fill the form in as a visitor would. When you are happy, click Publish. The label in the header changes from Draft to Live.
Next, open the form's Settings tab and check CRM & contact handling and Email me on new submission, then share it from the Share tab.
Troubleshooting
Why can I not create another form?
You have reached your plan's form limit. Free includes 1 form and Starter includes 20. Unlock a bigger plan in Settings, then Billing, or delete a form you no longer use.
The Appointment picker did not create a booking. Why?
The Appointment picker is a date and time question, so it records the time someone asks for but does not book it. To let people book real slots, share your booking page or add a Booking block to a page.
Where do the answers go?
Every answer appears on the form's Submissions tab and under Responses in Forms. To add people to your contacts as well, turn on Add or update submitter in CRM in the form's Settings tab.
Can I build forms on my phone?
The builder is made for a computer screen, so start and edit forms on a laptop or desktop. The published form itself works well on phones.
Omolola Akiyode is the operations and project manager at startbuddi, leading cross-functional projects and the content that helps founders get set up. Omolola writes about projects, websites and getting found online, and turns complex ideas into clear, practical steps.
Runs operations and projects at startbuddi