How to set up recurring invoices in startbuddi

Recurring invoices suit retainers, memberships and monthly lessons: the same client, the same amount, every month or quarter. In startbuddi you set up recurring invoices by creating a billing schedule once. Each invoice it makes is a draft, so you check it and send it yourself. If you would rather the customer is charged automatically by card, use subscriptions instead.
Recurring billing is on every plan. On Free, each invoice counts towards your 5 invoices a month. Read what recurring invoicing is if the idea is new.
Before you start
- Make sure the client is saved in your contacts with an email address.
- Agree the amount and the day of the month you will bill with your client.
- Connect Paystack or Stripe if you want them to pay each invoice online.
Recurring billing works with one line item per schedule. If a client pays for several things each month, describe them together in the line item, or create one schedule per service.
Steps
- Open the Recurring billing card
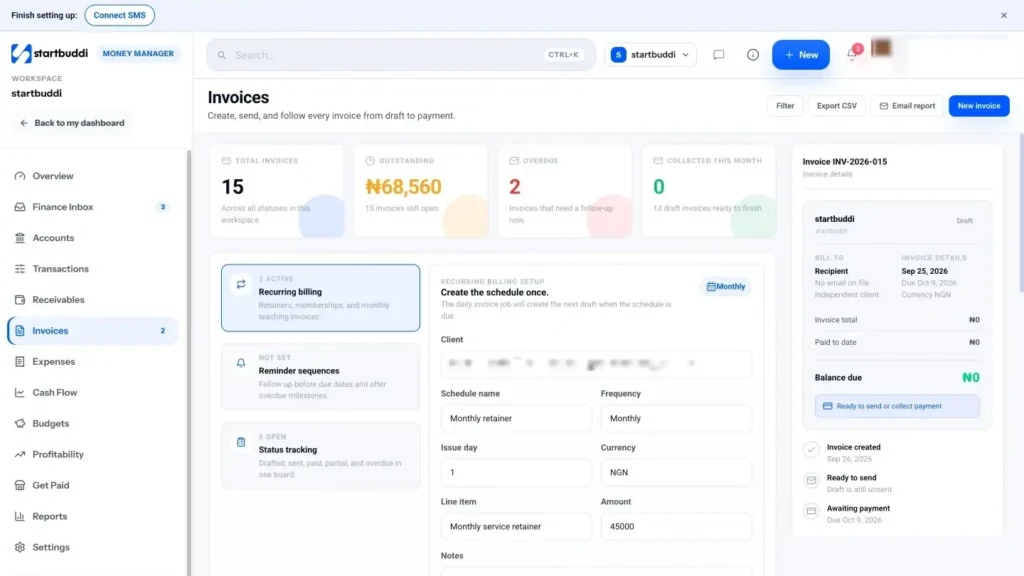
Go to Money Manager, then Invoices. Above the invoice list, click the Recurring billing card. The Recurring billing setup panel opens.
- Choose the client and schedule
Pick the Client (they need to be in your contacts). Give the schedule a Schedule name, such as "Monthly retainer". Set Frequency to Monthly or Quarterly, and enter the Issue day, the day of the month the invoice is dated.
- Add the amount
Enter the Currency, a Line item that describes the work and the Amount. Use Notes for payment instructions you want on every invoice.
- Create the schedule
Tick Generate the first draft now if you want this period's invoice straight away, then click Set up recurring billing. With the box ticked, the first draft opens so you can check it. Your schedules are listed in the panel with the next issue date.
- Send each draft
The schedule is set up to create the next draft when it is due. Nothing reaches your client until you send it. Around each issue day, open Invoices, filter to draft invoices, open the new one and click Send invoice.
- Add a reminder sequence
Click the Reminder sequences card. Set how many days Before due date to remind, tick Send on the due date, and list Overdue follow-up days, such as 3, 7, 14. Click Save reminder sequence. It applies to your sent invoices, not only recurring ones.
Reminder emails go to the customer on the invoice. You can also chase a single invoice by hand: open Receivables, go to the Overdue tab and click Remind on its row.
Next step: make sure Paystack or Stripe is switched on for these invoices so your client can pay in one tap each month.
Troubleshooting
It says select a client before creating recurring billing.
Schedules need a saved contact. Add the client in Customers (or create a one-off invoice with Also save as a contact ticked), then come back.
The next draft hasn't appeared on the issue day.
Check the draft invoices filter first. If it is not there, create the invoice by hand with New invoice so your client is not kept waiting, and let support know.
How do I change the amount or stop a schedule?
The panel lists your schedules but doesn't have an edit button yet. Contact support to change or stop one, and simply don't send drafts you don't need.
Chinedu Kalu is the co-founder and chief operating officer of startbuddi, responsible for how the company runs day to day. Chinedu writes about the operational side of a small business: registering and running the company, money, hiring and the routines that keep a team on track.
Co-founded startbuddi and runs its operations