How to set up your Money Manager in startbuddi

Money Manager is where you send bills, get paid, track spending and see what is coming next. This guide walks you through setting it up in about 20 minutes. It is on every plan: Free includes 5 invoices a month, and Starter and above include unlimited invoices. Compare plans on the pricing page.
You only need to do this once. After that, the overview tells you what came in, what is going out and what needs attention. See Money Manager for a tour of everything inside.
What you need
- The bank account you want to be paid into.
- Your logo and brand colour, if you want branded invoices.
- A rough list of your regular monthly costs, such as rent, software and internet.
- One customer you are ready to bill.
Steps
- Open Money Manager
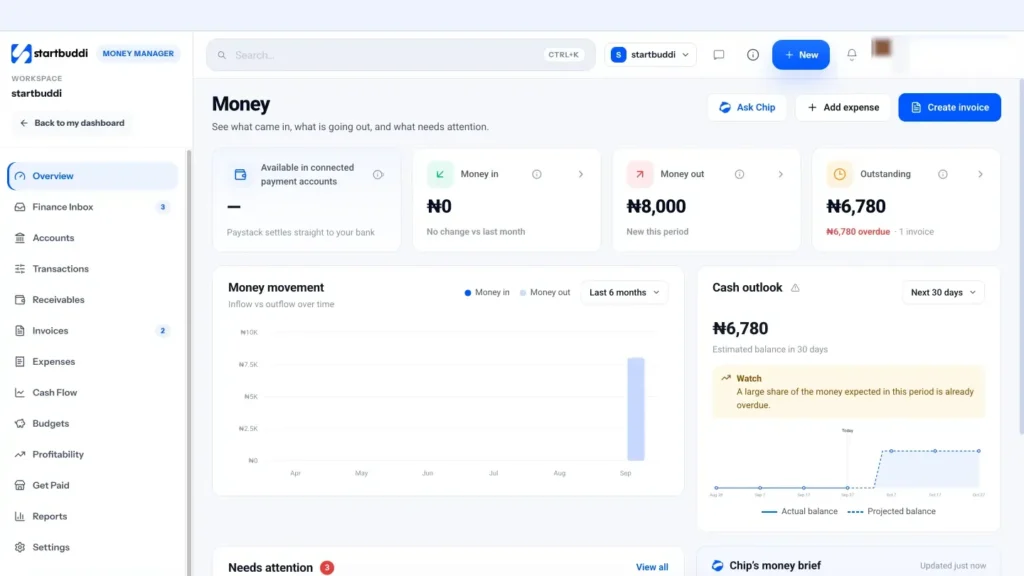
Click Money Manager in the Finance section of the sidebar. The overview, titled Money, shows Money in, Money out, Outstanding and your cash outlook. It will be quiet until you add some activity.
- Connect how you get paid
Open Settings in the Money Manager menu. On How you get paid, set up at least one method:
- Paystack for cards, bank transfer and USSD, settling to your Nigerian bank account.
- Stripe for card payments worldwide, paid into your own Stripe account.
- Bank transfer: fill in Bank name, Account name and Account number, then Save bank details. These show on your invoices.
- PayPal: add a PayPal.me link or email, then Save PayPal.
startbuddi never holds your money. Every method pays your own account directly.
- Set your invoice defaults
Open the Invoice defaults tab. Choose your Default payment provider and Workspace currency (NGN, USD or GBP), then your Invoice prefix, Due after, Tax label, Tax rate and Invoice footer note. Click Save changes.
- Add your logo and colour
In Settings, then Workspace, upload your logo and choose your Brand Color so invoices look like yours. The branding guide covers the details.
- Record your regular costs
Go to Expenses and use Add recurring for rent, software and other bills you pay every month. Add recent one-off spending with Add expense. This is what makes your cash forecast useful.
- Send your first invoice
Back on the overview, click Create invoice, fill it in and click Create and send. The first invoice guide goes step by step.
- Check your Finance Inbox
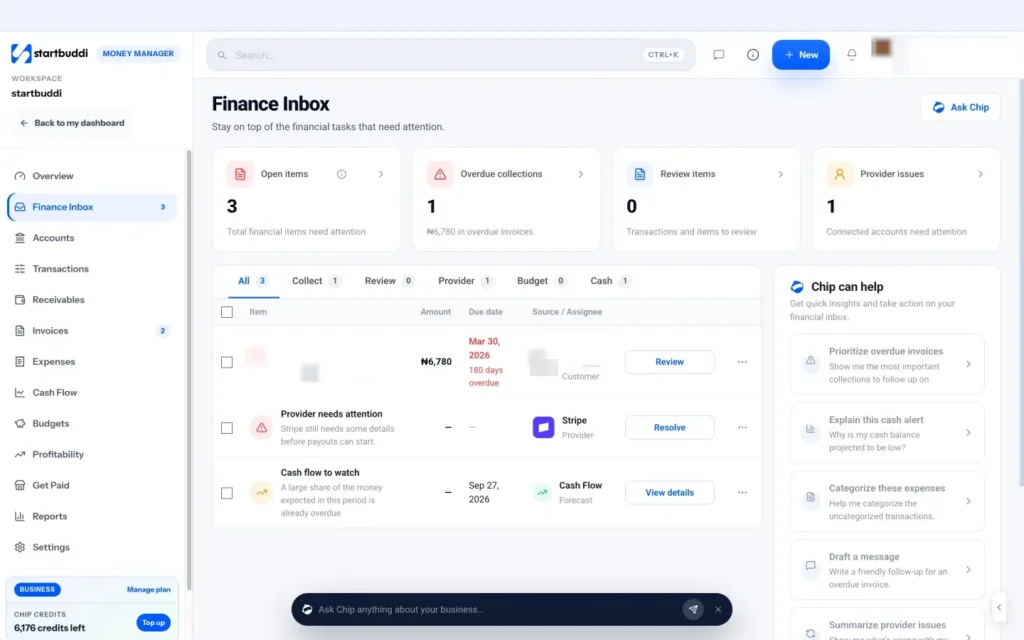
Open Finance Inbox in the Money Manager menu. It lists what needs you: overdue invoices, failed payments, uncategorised expenses and provider issues. Items clear themselves once they are dealt with.
You can also ask Chip from the overview: the Ask Chip button summarises what came in, what went out and what needs your attention this month. Chip replies use your Chip credits.
Next step: come back to the overview once a week. The Needs attention box and the cash outlook will tell you what to chase and what to plan for.
Troubleshooting
Do I have to connect Paystack or Stripe before I can invoice?
No. You can create invoices and record expenses straight away, and invoices with bank transfer details work without either. Connecting a provider lets customers pay online and marks invoices paid for you.
Why does the balance card not show my Paystack money?
Paystack settles each payment straight to your bank, so there is no balance to show. Only a connected Stripe account shows a balance there.
Can I invoice in a currency other than my workspace currency?
Yes. Each invoice takes any three-letter currency code. Totals on the overview are shown in your workspace currency, with other currencies listed separately.
Chinedu Kalu is the co-founder and chief operating officer of startbuddi, responsible for how the company runs day to day. Chinedu writes about the operational side of a small business: registering and running the company, money, hiring and the routines that keep a team on track.
Co-founded startbuddi and runs its operations