How to set up a sending domain for your emails

A sending domain lets your marketing emails come from your own address, like hello@yourbusiness.com, instead of a shared startbuddi address. Verifying it proves the email really is from you, so more of it reaches the inbox. To set one up, add your domain in Email Marketing, copy the DNS records it gives you to wherever you bought the domain, then check DNS until it shows Verified.
It also matters for volume. Without a verified domain, marketing email from the shared address is capped at 1,000 a month and 200 a day, whatever your plan. Once your domain is verified, you can send your plan’s full allowance.
Who can do this: your own sending domain is available on every paid plan and during a trial, but not on Free. You’ll need a domain you own and access to its DNS settings at your registrar or host. See email marketing for everything else you can do once it’s set up.
Before you start
- Know where your domain’s DNS is managed. It’s usually where you bought the domain, or your web host if you moved it there.
- Have the login for that account ready, or ask whoever set up your website to add the records for you.
- Decide which address you’ll send from, such as hello@ or news@ your domain, and make sure someone reads replies to it.
Steps
- Open Sending domains
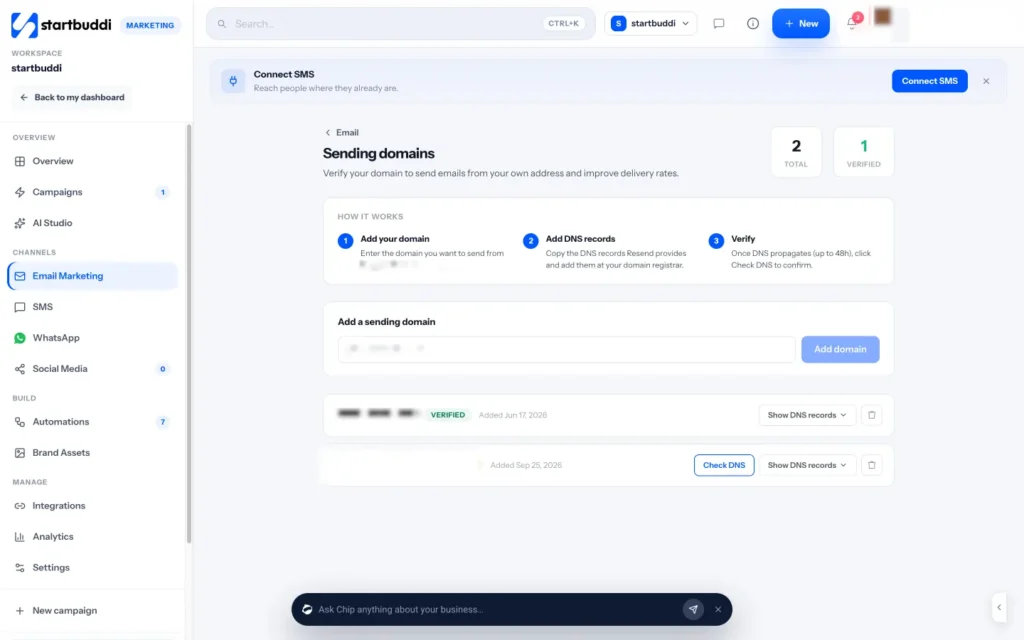
In Marketing › Email Marketing, open the Settings tab. Next to Sending domain, which shows Verified or Not verified, click Manage. The page shows the three steps: add your domain, add DNS records, verify.
- Add your domain
Under Add a sending domain, type the domain you want to send from, such as yourbusiness.com (no www and no email address), then click Add domain. It appears in the list with the status Pending.
- Copy the DNS records to your registrar
Click Show DNS records to see each record's Type, Name and Value. Sign in wherever you manage your domain's DNS, then add each record exactly as shown. Add them alongside your existing records; don't delete the ones your current mailbox or website use.
- Check DNS until it's verified
DNS changes can take anything from a few minutes to 48 hours to spread. Come back and click Check DNS. When every record is found, the status changes to Verified.
- Set your From address and footer
Back on the Email Marketing Settings tab, set the From address people see and reply to, using your verified domain. Then check Footer address: marketing email has to show a real postal address, and it appears in small print on every send.
- Send yourself a test
Create a campaign and, on the Review step, click Send a test. Check it arrives from your own address and lands in the inbox, not spam.
Troubleshooting
My domain has been pending for hours.
Check each record against the Show DNS records list. A common slip is the Name field: some registrars add your domain automatically, so pasting the full name makes it appear twice. Enter only the part before your domain if your registrar does this, save, wait, then click Check DNS again.
Can I send from a Gmail or Yahoo address?
No. You can only verify a domain you own and control, such as yourbusiness.com. If you don't have one yet, buy one from any domain registrar first.
The status says Failed.
One or more records didn't match. Correct them at your registrar, give it time to update, then click Check DNS again. If it still fails, contact startbuddi support with a screenshot of your DNS records.
Olabimpe Salami is the email and outreach specialist at startbuddi. Olabimpe writes about the messages that bring customers in and back: email, WhatsApp and SMS campaigns, follow-ups, and turning enquiries into paying clients.
Runs email and outreach at startbuddi