How to Create and Verify Your Startbuddi Account (Step-by-Step Guide)
If you’re looking to get started on Startbuddi, the process is straightforward and only takes a few minutes. This guide walks you through exactly how to create a Startbuddi account, verify your email, and access your dashboard, including what to do if something doesn’t go as expected.
Step 1: Fill In Your Account Details
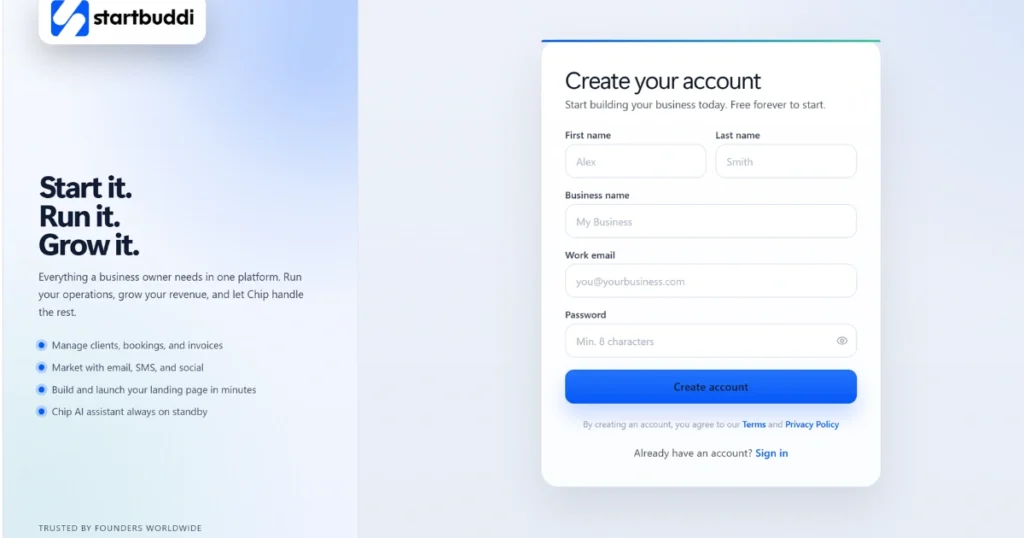
The first step to learning how to create a Startbuddi account is navigating to the Startbuddi signup page. Fill in the following information:
- First Name
- Last Name
- Business Name
- Work Email Address
- Password
Take a moment to double-check everything before moving on, especially your email address. Since Startbuddi uses your email for verification, even a small typo can cause unnecessary delays.
Step 2: Click “Create Account”
Once all your details are filled in correctly, click the “Create Account” button. The system will immediately process your information and move you to the next stage of the signup process.
Step 3: Watch for the Email Verification Notification
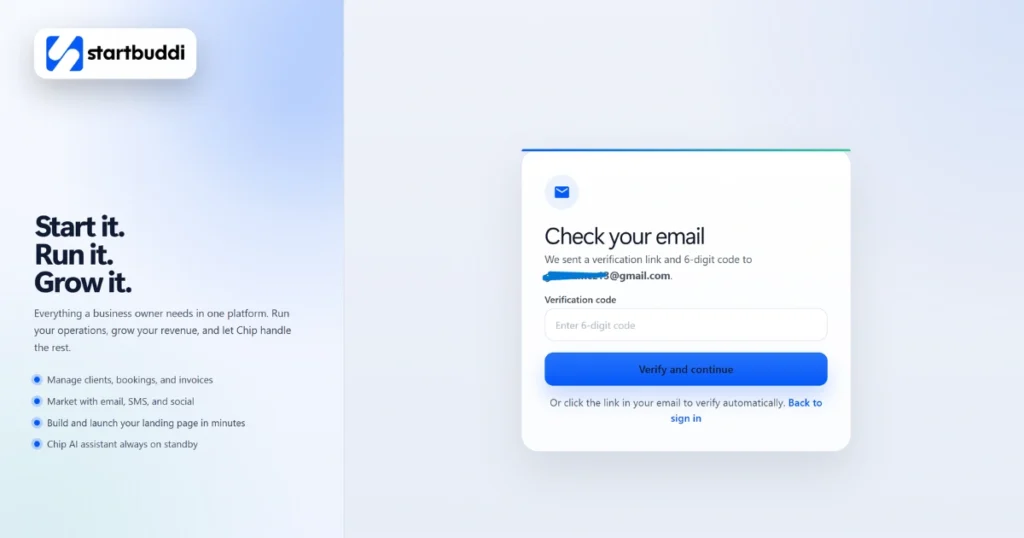
Right after you create your account, Startbuddi will display a message on your screen letting you know:
- Startbuddi has sent a verification link to your email
- Startbuddi has also sent a six-digit verification code (also called a token)
At this point, leave the Startbuddi tab open and switch over to your email inbox.
Step 4: Open Your Verification Email
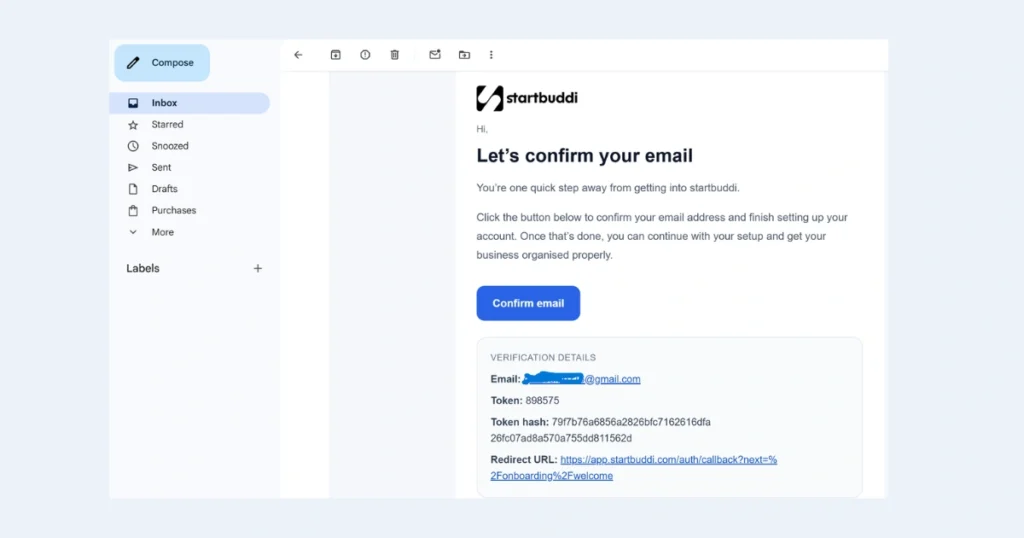
In your inbox, look for an email from Startbuddi. Inside, you will find two things:
- A clickable verification link
- A six-digit code
You will need both of these to complete the verification process.
Step 5: Verify Your Email Address
Here is how the verification process works:
- Click the verification link in your email. This will open a page on Startbuddi.
- On that page, Startbuddi will ask you to enter the six-digit code from your email.
- Once you submit the code, Startbuddi confirms your email address and your account setup is complete.
Both steps are required. The link takes you to the right page, and the code is what actually confirms your account.
Step 6: Continue Your Account Setup
Once you verify your email, you’re in. From here, you can continue setting up your business profile on the platform, organizing your account, adding relevant details, and exploring everything Startbuddi has to offer.
What to Do If Startbuddi Verification Isn’t Working
Even when you follow every step correctly, technical hiccups can occasionally happen. Here’s how to handle the most common issues:
Startbuddi Confirmation Link Not Working?
If the verification link in your email isn’t responding, don’t panic. Look for the “Back to Sign In” option on the Startbuddi page and use the manual sign-in method described in Step 7 below.
Startbuddi Verification Code Not Working?
If you enter the six-digit code and receive a message saying it is invalid or expired:
- Go back to the page showing the “Check your email” notification
- Look for the “Back to Sign In” option and click it
- Enter your email address and the password you created during signup
In most cases, this manual sign-in will grant you direct access to your dashboard without needing to complete the verification step again.
Step 7: Sign In and Access Your Dashboard
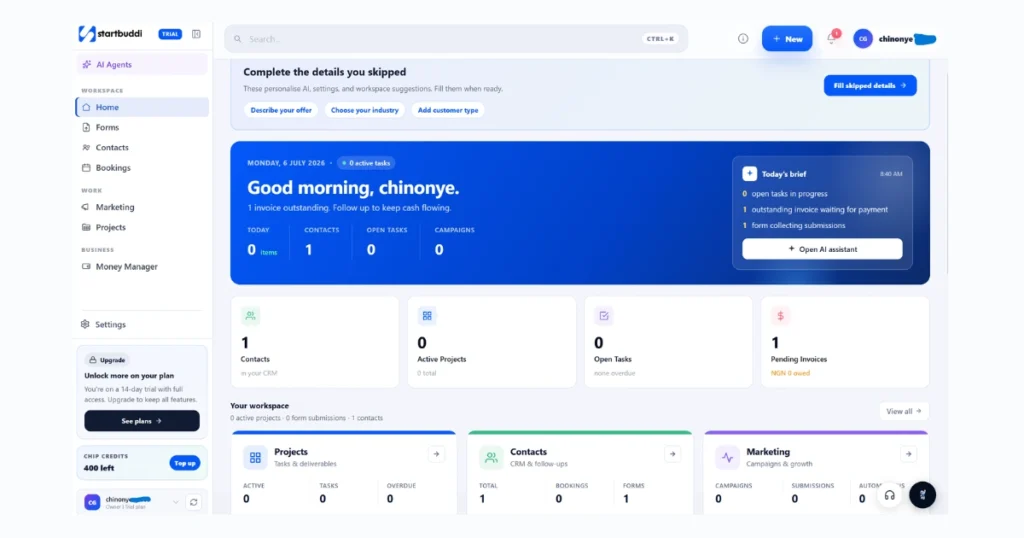
After clicking “Back to Sign In” and entering your credentials, you should land on your Startbuddi dashboard. From there, you can pick up where you left off and continue setting up your business account.
Quick Summary
Here’s the complete process from start to finish:
- Enter your personal and business details
- Click “Create Account”
- Check your email for the verification link and six-digit code
- Click the verification link, then enter the six-digit code on the page it opens
- If verification doesn’t work, sign in manually using your email and password
- Access your dashboard and continue setup
Conclusion
Now that you know how to create a Startbuddi account, the process should feel simple and manageable from start to finish. Most users complete it in under five minutes. Follow the steps above carefully, and you’ll be set up in no time. And if you ever run into trouble, whether the Startbuddi confirmation link isn’t working or the verification code appears invalid, the manual sign-in route is always there as a reliable fallback.
The platform is designed to be accessible and easy to navigate from the very first step, so don’t let a minor technical snag slow you down